How to Install Tor Browser on Linux Mint 21 or 20
https://www.linuxcapable.com/how-to-install-tor-browser-on-linux-mint/
For those using Linux Mint 21 or the older stable release of Linux Mint 20, understanding how to install the Tor Browser can be a pivotal step in enhancing online privacy and security. The Tor Browser, with its unique architecture, offers a fortified browsing experience, ensuring that your online activities remain confidential and shielded from prying eyes.
Here are some of the standout features of the Tor Browser:
- Anonymity: The browser reroutes your online traffic through a series of relays, making it difficult to trace back to the user.
- No Tracking: Tor ensures your online footprints are minimal by not retaining your browsing history.
- Deep Web Access: It enables users to explore .onion websites, which are not accessible via standard browsers.
- Bypass Censorship: Tor can navigate around regional internet restrictions, providing access to blocked content.
- Protection Against Surveillance: It offers a defense mechanism against websites attempting to gather personal data.
- Isolation of Each Website:** Each website you visit is treated separately, preventing cross-site tracking.
This guide will provide detailed steps on how to install the Tor Browser on Linux Mint 21 or Linux Mint 20. By integrating the Tor Browser into your Linux Mint system, you’re taking a proactive approach to safeguard your online presence, utilizing one of the most advanced tools available for digital privacy.
Section 1: Install Tor Browser via APT on Linux Mint
[edit | edit source]This section will focus on installing Tor Browser on Linux Mint using the APT package management tool. APT stands for Advanced Package Tool, an efficient way to manage packages on Debian-based systems such as Linux Mint. The steps are easy to follow, and this method ensures that Tor Browser is installed from a verified source.
Step 1: Refresh and Upgrade the Linux Mint System
[edit | edit source]It’s good practice to start with a system update. This ensures that the package list and the system are up to date, which helps avoid potential package conflicts during the installation.
``` sudo apt update sudo apt upgrade ```
The first command (`sudo apt update`) refreshes the package list, ensuring your system knows about the latest versions of packages and their dependencies.
The second command (`sudo apt upgrade`) will upgrade all the installed packages to their latest versions. This step is crucial in maintaining a secure and stable system.
Step 2: Install Tor Browser Launcher
[edit | edit source]Tor Browser Launcher is a tool that simplifies the process of downloading, installing, and keeping the Tor Browser up to date. It’s a convenient option, as it manages Tor Browser installations through the native package manager.
Execute the following command to install Tor Browser Launcher:
``` sudo apt install torbrowser-launcher ```
This command fetches the `torbrowser-launcher` package from the repositories and installs it on your system.
Note: Alternate Installation Methods on Linux Mint for Tor Browser
[edit | edit source]While this guide recommends using Tor Browser Launcher, you may also consider alternative installation methods, such as using Flatpak, a third-party installation manager, or downloading the archive manually. However, the APT method outlined above is recommended for easy installation and updates.
Section 2: Install Tor Browser via Flatpak and Flathub on Linux Mint
[edit | edit source]This section will explore an alternative Tor Browser installation on Linux Mint utilizing Flatpak. Flatpak is an adaptable package manager that functions across various distributions. It enables you to install the latest versions of packages that might not be available in your distribution’s main repositories. Linux Mint includes Flatpak by default.
Step 1: Ensure Flathub Repository is Enabled for Tor Browser on Linux Mint
[edit | edit source]Flathub is a repository for hosting Flatpak applications. It’s essential to have Flathub enabled to access a wide range of applications, including the Tor Browser. Though Flathub should be enabled by default in Linux Mint, running the following command ensures it’s available:
``` sudo flatpak remote-add --if-not-exists flathub https://flathub.org/repo/flathub.flatpakrepo ```
This command checks if Flathub is added as a remote repository for Flatpak; if it’s not, it adds it. This step is crucial to ensure the following commands can locate and install the Tor Browser from the right source.
Step 2: Install Tor Browser with Flatpak on Linux Mint
[edit | edit source]With Flathub enabled, you can now proceed to install Tor Browser. Use the following command to install it from Flathub:
``` flatpak install flathub com.github.micahflee.torbrowser-launcher -y ```
This command tells Flatpak to install the Tor Browser package from Flathub. The `-y` flag at the end signifies your confirmation, so the installation proceeds without asking for a manual confirmation.
Note: Advanced Flatpak Users
[edit | edit source]For individuals who rely on Flatpak for managing applications in Linux Mint, it’s beneficial to be updated with Flatpak features and usage. To learn more about upgrading and advanced management of Flatpak, refer to this detailed guide: [How to Upgrade Flatpak on Linux Mint](https://www.linuxcapable.com/how-to-upgrade-flatpak-on-linux-mint/).
Section 3: Install Tor Browser via Manual Download on Linux Mint
[edit | edit source]This section illustrates a more hands-on method for installing the Tor Browser on Linux Mint. This procedure directly downloads the latest browser version from the Tor Project website. This guarantees you are installing the most recent build. While the browser has self-update capabilities, significant updates might require you to repeat this manual installation process.
Step 1: Download Tor Browser Archive on Linux Mint
[edit | edit source]Tor Browser’s current versions are consistently available as `.tar.xz` archive files from the Tor Project’s official website. The `wget` command is an efficient tool for downloading these files through the terminal. Use the command below:
``` wget https://www.torproject.org/dist/torbrowser/{version}/tor-browser-linux64-{version}_ALL.tar.xz ```
Make sure to replace `{version}` with the actual version number of the Tor Browser you intend to download. It’s advisable to check the Tor Project’s official download page to ensure you are downloading the latest version.
Step 2: Extract the Downloaded Archive
[edit | edit source]After downloading the archive, extract its contents. The `tar` command can perform this task:
``` tar -xvJf tor-browser-linux64-{version}_ALL.tar.xz ```
Again, ensure that `{version}` is replaced with the actual version number of the downloaded Tor Browser.
Step 3: Move the Tor Browser Directory and Register as a Desktop Application
[edit | edit source]It’s considered best practice to relocate the Tor Browser directory to a location conventionally used for applications. The `/usr/local/share` directory is a logical choice as it is commonly used for shared data of local applications.
To move the `tor-browser` directory to `/usr/local/share`, execute the following command:
``` sudo mv tor-browser /usr/local/share/ ```
Notice the use of `sudo` because altering the contents of `/usr/local/share` requires root privileges.
Navigate to the new directory by using the `cd` command:
``` cd /usr/local/share/tor-browser ```
With the files in the appropriate directory, register the Tor Browser as a desktop application:
``` ./start-tor-browser.desktop --register-app ```
The output should indicate that the Tor Browser has been registered as a desktop application:
``` Tor Browser has been registered as a desktop app for this user in ~/.local/share/applications/ ```
Your Tor Browser is now installed and ready to run. This method ensures that you control the version you install, making it suitable for those who require particular versions or want to ensure they have the latest available build for enhanced security and privacy.
Section 4: Launching and Configuring the Tor Browser on Linux Mint
[edit | edit source]After successfully installing the Tor Browser on your Linux Mint system, it’s time to launch it and explore its configurations.
Launching Tor Browser on Linux Mint
[edit | edit source]Via Terminal
[edit | edit source]For users who have installed Tor Browser using Flatpak, launch it by running the following command in the terminal:
``` flatpak run com.github.micahflee.torbrowser-launcher ```
This command tells Flatpak to execute the Tor Browser launcher. You can also create a custom alias to launch the browser more quickly.
Via Graphical Interface
[edit | edit source]The Tor Browser can be found in the Internet category within your system menu if you prefer using a graphical interface. To launch it, navigate through the following path:
``` Taskbar > Internet > Tor Browser ```
_Example:_
[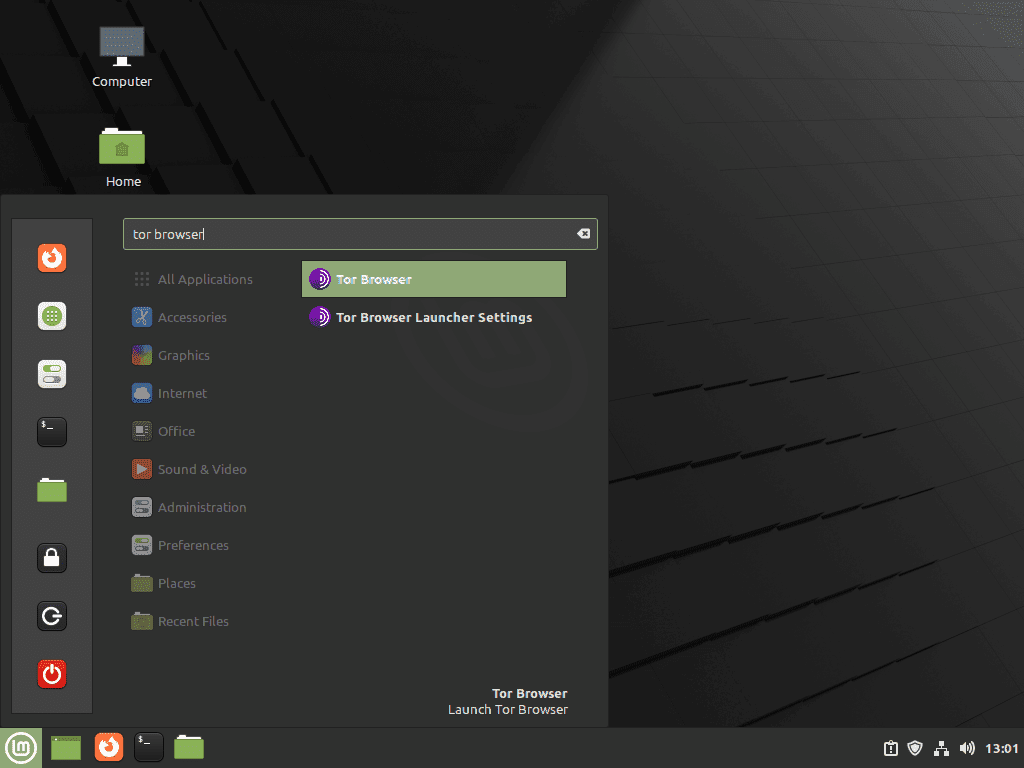Pin](https://www.linuxcapable.com/wp-content/uploads/2022/12/launch-tor-browser-on-linux-mint-21-or-20.png)
Initiating the Tor Browser on Linux Mint for the first time.
First Interaction with the Tor Browser
[edit | edit source]Upon launching the Tor Browser for the first time, a window presents two options: “Connect” and “Configure Connection…”
[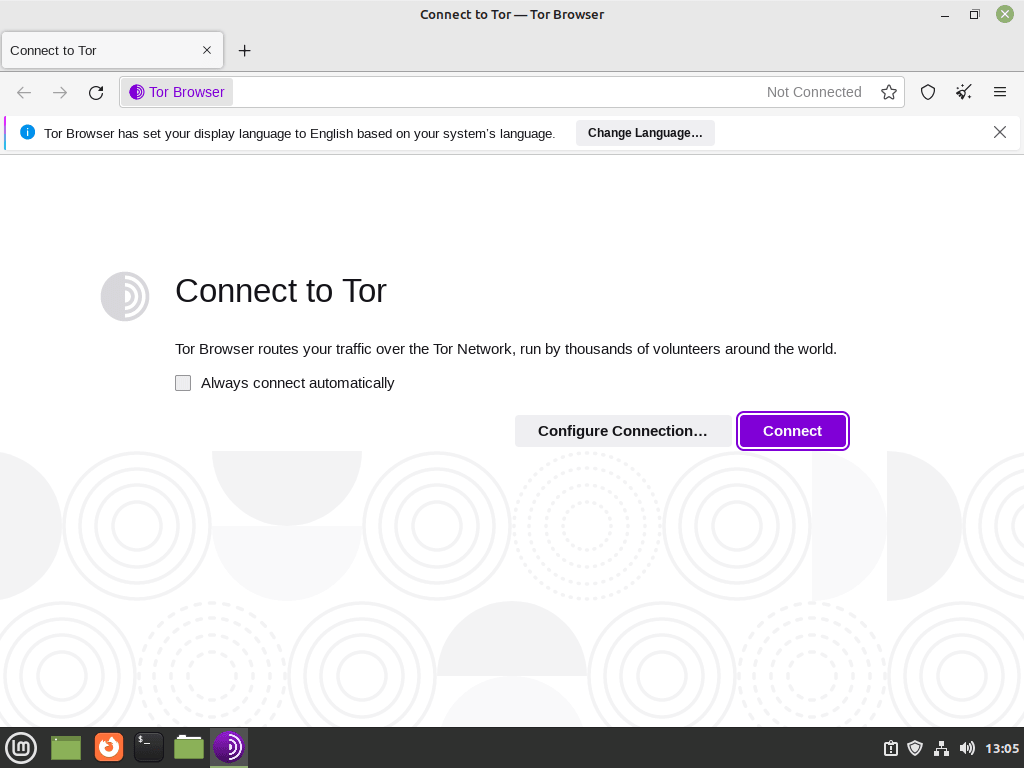Pin](https://www.linuxcapable.com/wp-content/uploads/2022/12/tor-browser-connect-panel-example-on-linux-mint-21-or-linux-mint-20.png)
The primary connect panel of Tor Browser on Linux Mint 21/20.
Option 1: Connect
[edit | edit source]Most users will opt for the “Connect” option, which is ideal for general browsing. This default option will connect you to the Tor network with standard settings.
Option 2: Configure Connection for Advanced Users
[edit | edit source]For users in regions with strict internet censorship or those needing advanced privacy features, “Configure Connection…” enables you to set up proxy settings and Tor bridges. Tor bridges are essential when facing difficulties accessing specific sites or requiring a more stable connection.
After selecting “Connect,” the Tor Browser will initiate the connection to the Tor network. This may take 15 to 60 seconds, depending on your location and the network you’re connecting to.
[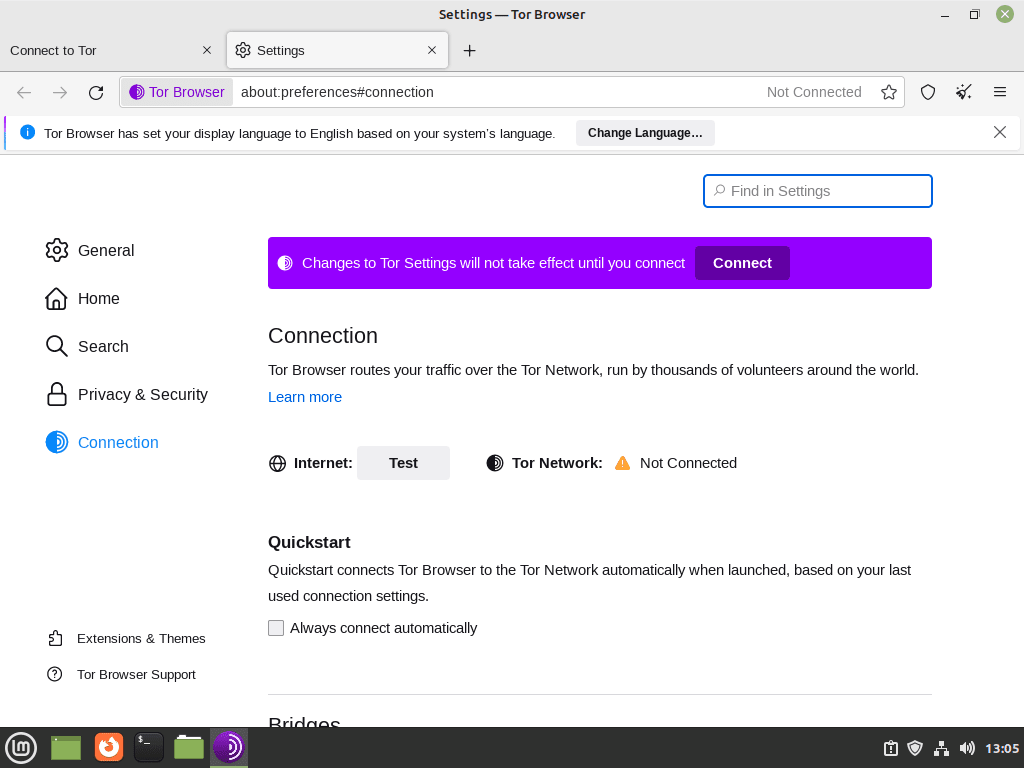Pin](https://www.linuxcapable.com/wp-content/uploads/2022/12/example-connection-configuration-page-for-tor-browser-on-linux-mint-21-or-linux-mint-20.png)
Setting up connection preferences in Tor Browser on Linux Mint.
Not only is Tor an excellent way to anonymity browse the Internet without being traced, but it also has bridges! You can request or set pre-made ones to help you evade blocks. For example, on linuxcapable.com, if someone uses their malicious attacker’s Node to access this site through blocked entrances like The Onion Router (TOR), my automatic security rules may temporarily block access until they’re gone again.
So, you may need to select one of the many other bridges not being used to attack my website; for example, this applies to many websites on the Internet.
__Example **(Click Image to Expand)**:__
[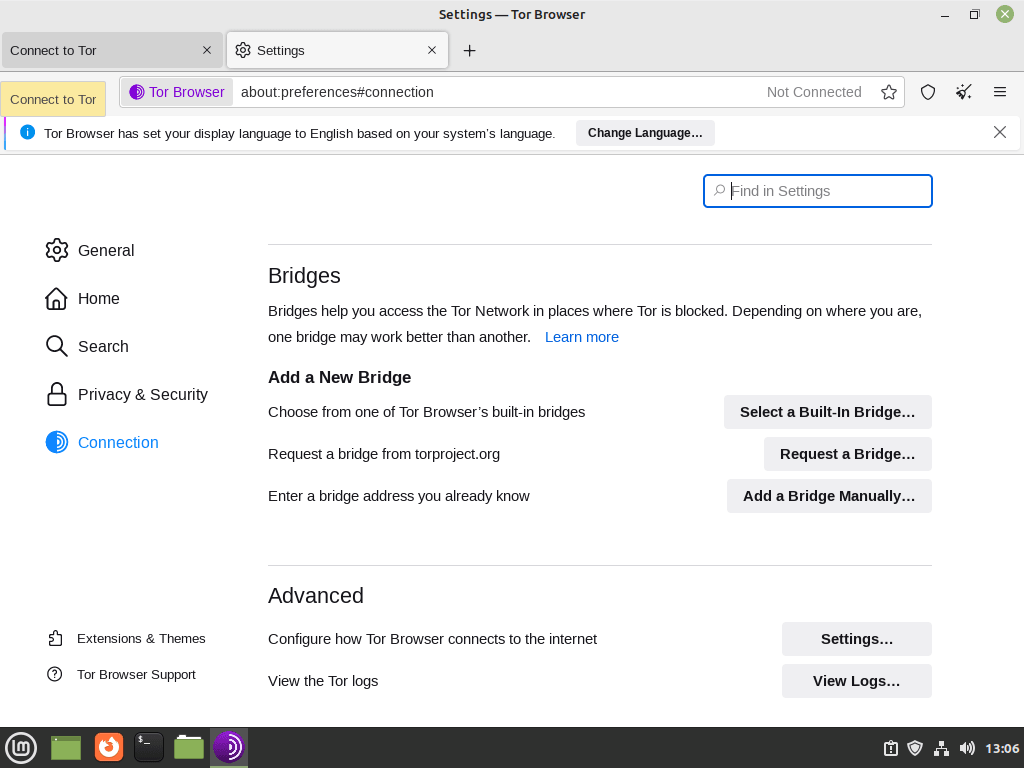Pin](https://www.linuxcapable.com/wp-content/uploads/2022/12/example-of-bridges-settings-in-tor-browser-for-linux-mint-21-or-linux-mint-20.png)
Navigating the bridges settings in Tor Browser on Linux Mint.
[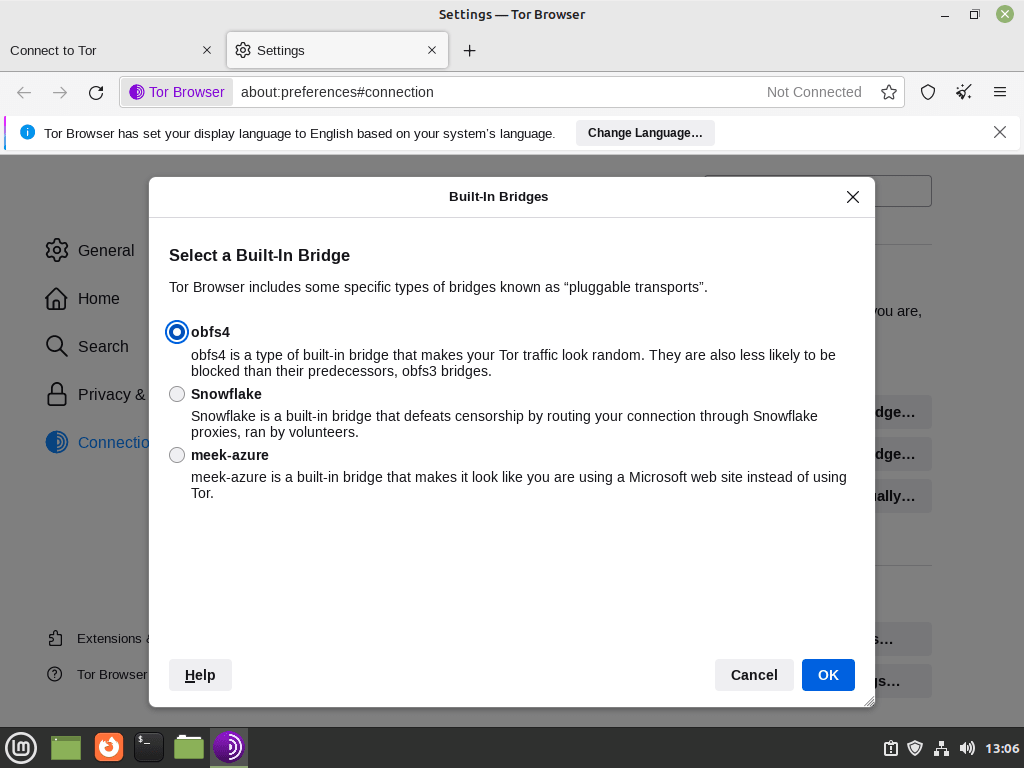Pin](https://www.linuxcapable.com/wp-content/uploads/2022/12/select-a-built-in-bridge-for-tor-browser-on-linux-mint-21-or-20.png)
Choosing a built-in bridge for enhanced connectivity in Tor Browser on Linux Mint.
Navigating the Tor Browser Landing Page
[edit | edit source]After the connection process concludes, you’ll be directed to the Tor Browser’s default landing page. The browser uses DuckDuckGo as its default search engine, lauded for its robust privacy features.
[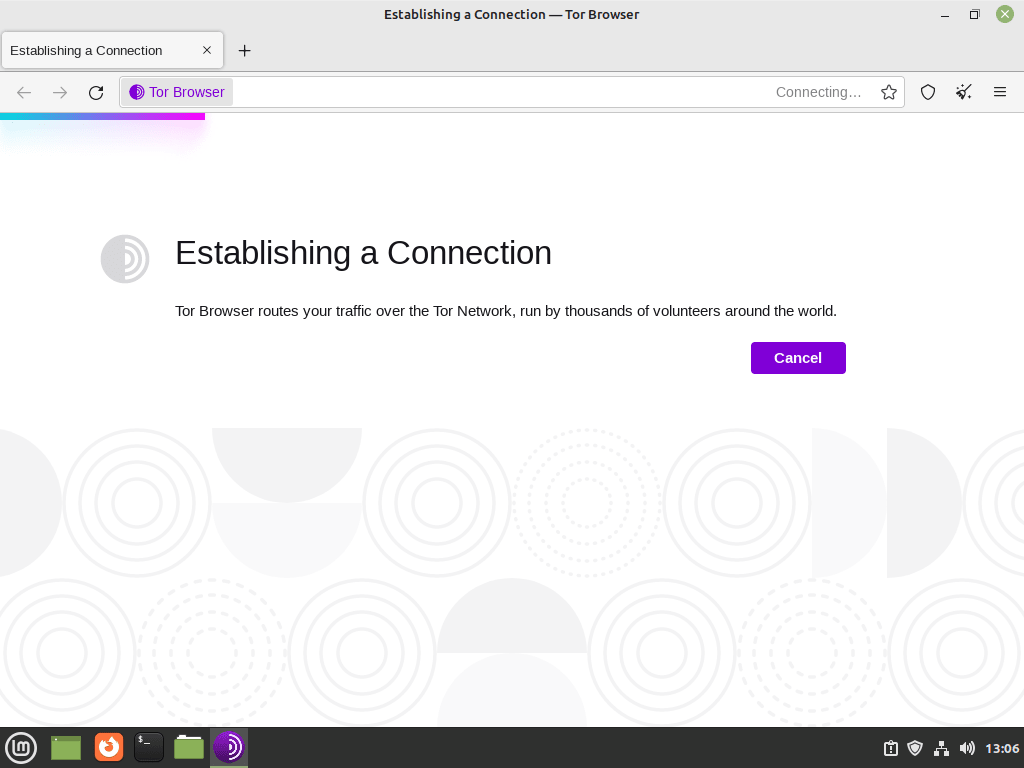Pin](https://www.linuxcapable.com/wp-content/uploads/2022/12/establish-connection-to-tor-network-on-linux-mint-21-or-linux-mint-20.png)
The final step in connecting to the Tor Network using Linux Mint.
[Pin](https://www.linuxcapable.com/wp-content/uploads/2022/12/tor-browser-installed-successfully-on-linux-mint-21-or-linux-mint-20.png)
Tor Browser ready to use on Linux Mint 21/20.
Congratulations, you have connected to the Tor Network through your Tor Browser.
Section 5: Tips for Getting Started with Tor Browser on Linux Mint and Linux Distros
[edit | edit source]In this section, you’ll gain insights into valuable tips and best practices for effectively using the Tor Browser on Linux Mint and other Linux-based systems. These tips are aimed at ensuring a secure and efficient browsing experience.
Step 1: Keep the Tor Browser Updated
[edit | edit source]Importance of Updates
[edit | edit source]It’s essential to keep your Tor Browser updated to the latest version. Updates often contain security patches and new features that enhance browsing security and experience. Since the Tor Browser is a security-focused tool, staying updated is crucial in protecting your online privacy.
How to Update
[edit | edit source]On Linux Mint and other Linux distros, you can check for Tor Browser updates by clicking on the hamburger menu in the browser’s upper-right corner and then selecting “Check for Tor Browser Update.”
Step 2: Customize Security Settings
[edit | edit source]Fine-tuning for Enhanced Security
[edit | edit source]The Tor Browser provides various security levels you can customize according to your browsing requirements. You can tweak the security settings by accessing the shield icon beside the URL bar. Raising the security level may disable certain web content but also reduce exposure to potential online threats.
Step 3: Use Tor Bridges
[edit | edit source]Overcoming Censorship and Connection Issues
[edit | edit source]Tor bridges can be used in regions where Tor is blocked or if you face connection difficulties. They serve as intermediaries that help you connect to the Tor network without your Internet Service Provider (ISP) knowing you are using Tor. When launching the Tor Browser, you can set up bridges by selecting the “Configure Connection…” option.
Step 4: Limiting the Use of Add-ons
[edit | edit source]Risks of Add-ons
[edit | edit source]Although tempting, avoiding installing too many add-ons in the Tor Browser is recommended. Add-ons can create unique browser fingerprints, which can be used to track your browsing activities.
Step 5: Be Cautious with Torrenting
[edit | edit source]Torrenting Risks in Tor Browser
[edit | edit source]It is advisable to avoid using the Tor Browser for torrenting. Doing so can reveal your IP address, negating the Tor network’s anonymity. Moreover, torrenting over Tor can slow down the entire network, affecting other users.
Step 6: Use HTTPS Whenever Possible
[edit | edit source]Enhancing Data Security
[edit | edit source]While Tor encrypts your data through the Tor network, it doesn’t encrypt data beyond the exit nodes. Always ensure to use HTTPS for an extra layer of security. This encrypts data between the exit nodes and the final destination, preventing potential eavesdropping.
By incorporating these tips, users can enhance their security and browsing experience using the Tor Browser on Linux Mint and other Linux-based systems. As a security-centric browser, understanding the Tor Browser’s features and best practices is essential for capitalizing on its benefits.
Section 6: Managing Tor Browser on Linux Mint
[edit | edit source]This section focuses on managing the Tor Browser on Linux Mint, including how to update and remove the browser in case it’s no longer required. These procedures are essential in maintaining a secure and efficient browsing environment.
Keeping Tor Browser Updated on Linux Mint
[edit | edit source]Understanding the Significance of Updates
[edit | edit source]It is imperative to ensure that Tor Browser is updated as it includes essential security patches and possibly new features. It contributes to keeping your browsing activities secure.
In-Browser Updates
[edit | edit source]Tor Browser typically manages its updates within the browser. However, additional dependencies may need updating through the system’s package manager.
Updating via APT
[edit | edit source]If you installed Tor Browser using the APT package manager, execute the following command in the terminal:
``` sudo apt update && sudo apt upgrade ```
This command first updates the package list and then upgrades all the installed packages, including the Tor Browser, to their latest versions.
Updating via Flatpak
[edit | edit source]For installations done via Flatpak, use the below command in the terminal:
``` flatpak update ```
This updates all Flatpak applications, including Tor Browser, to the newest versions available.
Step 2: Removing Tor Browser on Linux Mint
[edit | edit source]If, for any reason, you decide that you no longer need Tor Browser on your system, it’s crucial to remove it properly.
Removal via APT
[edit | edit source]If you initially installed Tor Browser using the APT package manager, enter the following command to remove it:
``` sudo apt remove tor torbrowser-launcher ```
This will uninstall the Tor Browser and its launcher.
Removal via Manual Method
[edit | edit source]If you installed Tor Browser manually and placed it in `/usr/local/share`, you need to remove the tor-browser folder. Use this command:
``` sudo rm -r /usr/local/share/tor-browser ```
This command deletes the tor-browser folder and all of its contents.
- Removal via Flatpak
For Flatpak installations, execute the following command to remove Tor Browser:
``` flatpak remove --delete-data com.github.micahflee.torbrowser-launcher -y ```
This command not only removes the Tor Browser but also deletes associated data.
By keeping the Tor Browser updated or removing it when no longer needed, you contribute to a secure and well-maintained system environment. Being well-versed in managing applications on Linux Mint is an essential skill for any user.
Conclusion
[edit | edit source]In conclusion, installing, managing, and using the Tor Browser on Linux Mint 21/20 is an essential skill for those who prioritize online privacy and security. This guide provided detailed instructions on how to install the Tor Browser, both manually and using various package managers like APT and Flatpak. We also explored how to launch and configure the browser for the first time, essential tips for getting started, and how to keep the browser updated or remove it when it’s no longer needed.
Using the Tor Browser can significantly enhance your online security and protect your privacy. However, it’s crucial to regularly update the browser and follow best practices to ensure optimal privacy protection. This guide aims to provide you with the knowledge to navigate your journey with Tor on Linux Mint confidently.


Pin)
Pin)
Pin)
Pin)
Pin)
Pin)
Pin)